Knitting and Random Craftiness

Swirl hat

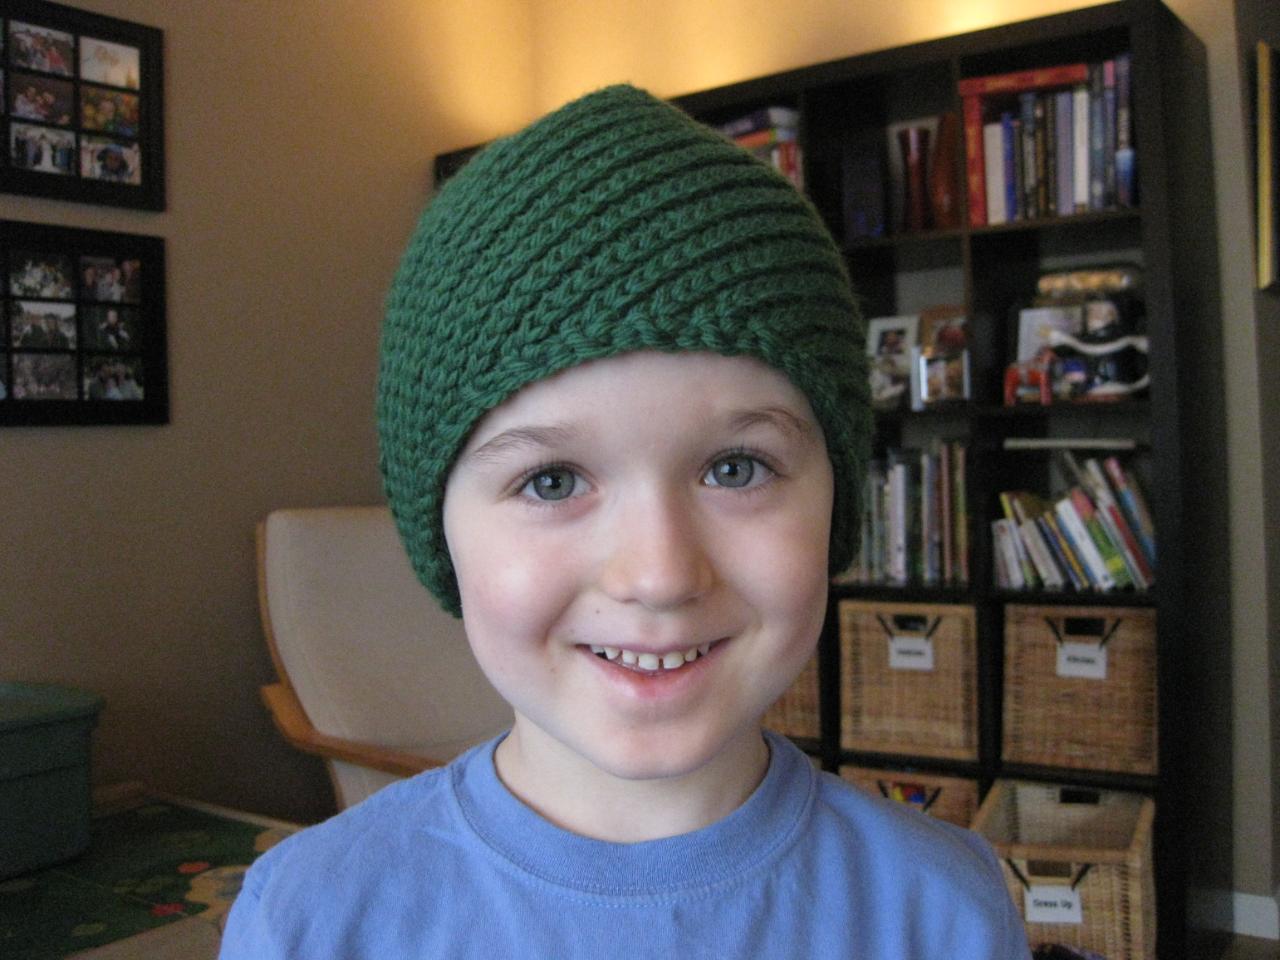
OK I started the Baby Swirl hat over again… and managed to finally finish it in a size that will fit Chanler!!!! Hallelujah!!!!

For the record here are the “changes” I made to the original pattern to fit my 5.5 year old’s 20.5 in head

Hook size: K
Yarn: Bulky weight
First Chain:46 (for a working length of 45)
Total rows: About 60

I am not totally pleased with how the seam turned out, and had to crochet a patch at the top because I couldn’t gather all the rows together into a small enough circle to make my kid happy (he was freaked out there was a hole in the top of his hat) , but other than that it is done and Chanler is happy to have it. I have to say the key to finally making it work was being obsessive about counting the stitches to make sure I wasn’t dropping any. Once I decided to be manic about counting the rest was easy (ish)

So for the record I only really knit in the fall and winter (i.e. when it is cold…) so I pulled out my knitting a few weeks ago – willing the weather to drop from 100’s to something more reasonable. Thankfully the temperature cooperated with me.

So far I have finished 2 Lattice pattern hats (the first one fit me, but was a bit short so I made a second and figured Jessaleigh would love to match…), then I had some wonder alpaca silk that just had to be used to I made my first sweater from this pattern and made up a hat pattern to coordinate. At this point Chanler was feeling a bit left out so I ordered him some lovely green wool to make this.

Now technically I CAN crochet – I just don’t usually. But I have to say I HATE THIS PATTERN!!!!! It is super simple (after you figure out the rotate 90 degrees at the end to get the swirl…) but in my opinion it is poorly written and has no examples. Maybe I don’t know how to crochet as well as I think I do, but this is getting on my nerves. I have started this hat 4 times already to get the increases and decreases looking right, there is no gauge or info about finished size to help me expand it to fit a nearly adult head, and now that I am well past the 37 rows called for it looks like the darn thing is going to be too short to cover Chanler’s whole head…

But yet I can’t give up! I have a little boy counting on me to finish this darn hat, but oh how I do hate crochet at this moment!!!!!

The toddler hat from hell is done! Not sure if I like it, but it is done, it fits, and Chanler likes it. Good enough for me!

As you know I made a lovely ten cable hat for the new baby (pictures coming once I have a suitable model *wink*) Well Chanler decided that he wanted a hat just like it . . . same color and everything. So back to the knitting store I went for more yarn.

To date
I have completely knit this hat once – it turned out two small, even after I adjusted the pattern and increased the number of stitches by 150%.
Revamped the pattern again (now up to 132 stitches) and cast on not once but 3 times.
Determined that I practice some personal form of pigeon knitting where I do knit stitches in the western method, but purl stitches in the combination knitting style. Meaning my purl stitches come out crossed on the inside of the work or when I switch from purl to knit. I also learned that combo knitting doesn’t work in the round and that I am going to have to figure out a new way to knit . . . grrrr
Cast on a final time, got to row 18 of the cabling and figured out that I had switched the last knit stitch on one of my cables to a purl stitch and then continued to follow the pattern (i.e. messing up any place where you change from purl to knit etc.) for 2 more cable sections. Oh yeah and the mistake was in row 10!
I think I have successfully recovered from that mistake, but I now have NO desire to pick up this project anymore (well other than to stop the whining about where “my (Chanler’s) hat is???”

This is why you shouldn’t do any complicated knitting at the end of pregnancy!

It’s done. I got the cashmerino yarn yesterday and finished the hat the same night (it is a small project – literally) Now I just need a model so that I can get a decent picture of it. (wink)

I have been meaning to post the pattern I used for Chanler’s froggie mittens for about 6 months and just finally got around to scanning it in (yes it is only a paper pattern – my mom got it as part of a kit she had when she was a child)

Well here it is . . .
View image

I decided to expand my knitting repertoire by teaching myself how to knit cables (well simple cables at least maybe I’ll tackle harder ones when I have my brain back.) I did this with socks a few months ago, but sort of ran out of steam after one toddler pair and half an adult pair (I have a hard time finishing when I don’t know what I am going to do with the item and I just can’t picture myself wearing the socks I started.)

I saw this pattern on a blog I read and it looked super cute and easy to make, so I thought I would start cabling with this. So far I made one newborn hat in some crap worsted weight yarn, just to see if I could. I decided that there was one (major) change I wanted to make for the “real thing” and I need to get some softer yarn. If only the local yarn shop were open on Monday’s life would be good. Oh well, I guess I will have to put this off until next year (he he – I love say things like that at this time of year.) Of course, when I am done with the hat for the new baby I will have to figure out how to make this patter big enough for a hat for Chanler too. The first thing he said when he saw me knitting yesterday was “Mommy, you making a hat for me?”

Original Pattern

Instructions for Ten-Cable Hat:

Size: Newborn

Supplies: One skein Debbie Bliss Cashmerino Aran
Needles: US8 DPNS
Cable needle (or an extra DPN)
Tapestry needle (for finishing)

Changes: 1) Switch the order of starting cables, so that you decrease first on the cables started first.
2) Insert an extra cable row at R26

Pattern:
CO 80 sts, pm, and join to work in the round.

Work 6 rounds of 2×2 ribbing. (Or 1×1, if you prefer.)

R 7-9: *K6, P2* around
R 10: *C6F, P2, K6, P2* around
R 11-13: *K6, P2*
R 14: *K6, P2, C6F, P2*
R 15-17: *K6, P2*
R 18: *C6F, P2, k6, P2*
R 19-21: *K6, P2*
R 22: *K6, P2, C6F, P2*
R 23-25: *K6, P2*
R 26: *C6F, P2, K6, P2*

Now, the decrease rows start . . .

R 27: *SSK, K2, K2tog, P2, K6, P2* (70 sts)
R 28: *K4, P2, K6, P2*
R 29: *SSK, K2tog, P2, C6F, P2* (60 sts)
R 30: *K2, P2, K6, P2*
R 31: *K2tog, P2, K6, P2* (55 sts)
R 32: *K1, P2, K6, P2*
R 33: *K1, P2tog, K6, P2tog* (45 sts)
R 34: *K1, P1, SSK, K2, K2tog, P1* (35 sts)
R 35: *K1, P1, SSK, K2tog, P1* (25 sts)
R 36: *K1, P1, K2tog, P1* (20 sts)
R 37: *K2tog* (10 sts)

Pull yarn through remaining sts with a tapestry needle. Pull through to inside, and weave in all ends.
I have almost finished (read I have to hem one side) the black out curtains for our bedroom.

As any parent of a small child knows the summer months are difficult because the sun is up until almost 9pm. And anyone with a bed time while the sun is still up will protest.

Most of the time (lately) Chanler has been going to be about 9 to avoid the said darkness problem. The only issue is that IF he doesn’t nap, then he can’t make it that late – he can only make it to about 7-7:30, but will still fight because of the light.

So I decided to make myself some blackout curtains from scratch. I bought some twin sheets (to match the color of our Ikea comforter) and black out material from Joann Fabric. This is a much bigger project than either of the two I have previously tried (hemming existing drapes and making throw pillows) and I maxed out on floor space to lay everything out.

But they are done (or at least functionally done) and they look good (as long as you don’t look too closely).

I have conquered my sewing machine . . .

Let me explain. “My sewing machine” is not actually mine, it is my mother-in-law’s that was permanently loaned to my sister-in-law who then had no room for it (darn babies need so much space;) ) so now it is living with me. It is OLD, really really old – which in some ways is good (it is made very solidly) and which also makes it a bit intimidating to use. It is also a brand I had never heard of (Elna) and that is hard to find parts for in a regular fabric store (you have to go to a real sewing machine store or shop on craigslist)

Anyway. Yesterday in a fit of homemakerness I hemmed my living room drapes (six of eight panels at least). They were originally from Ikea and are the “no sew” variety that they sell. Lets just say the “no sew” was not working for us.

Now they are perfect. the bottom almost grazes the floor, but doesn’t touch it. They are not too short (my biggest fear) and now kids can’t accidentally step on them. I am so proud.