Programming today is a race between software engineers striving to build bigger and better idiot-proof programs, and the Universe trying to produce bigger and better idiots. So far, the Universe is winning.
(Rich Cook)
Programming today is a race between software engineers striving to build bigger and better idiot-proof programs, and the Universe trying to produce bigger and better idiots. So far, the Universe is winning.
(Rich Cook)
Just taking a moment to write a review of the IDE to CF adapter that I chose for this project.
Except that I can not. Because I don’t know if it works yet. Because it DOES NOT FIT! ARG!!!
Currently waiting for the male to female 44 pin extension cable to arrive, so that I can forge ahead to the next roadblock.
Yes I am feeling a little frustrated.
I started with the lilo.conf from the /etc/lilo.conf, and customized it from there. I changed the layout from the cdrom slightly – instead of having the files under /boot/XXXXXX, I copied everything into /boot.
I don’t remember all the changes, and honestly I don’t feel like looking up the starter lilo.conf, but I will go through what I am currently using:
# /etc/lilo.conf – See: `lilo(8)’ and `lilo.conf(5)’,
lba32
boot=/dev/hda
install=/boot/isolinux.cfg
backup=/dev/null
map=/boot/map
timeout=30
vga=791
default=Knoppiximage=/boot/linux24
append=”lang=us hda=scsi initrd=/boot/minirt24.gz noicons nomce noapm nopcmcia noapic noagp noswap noddc quiet restore=hda1 BOOT_IMAGE=knoppix BOOT_IMAGE=linux24″
initrd=/boot/minirt24.gz
root=/dev/hda1
label=Knoppix
read-only
Some of the options may be different, based on your particular computer – I am pretty sure that it customizes the lilo.conf a little based on what it finds. Some of the more interesting things are:
install – I had to change this to point to the right place in /boot.
map – honestly not sure what this is for, but it is an output file, so don’t stress that you cannot find boot.map before running lilo. A real map is generated on the fly at boot time, so this could probably be deleted after lilo.conf is run, but it is small, so I have not tried to do this.
vga – YMMV – this is the value that I used, which gives me 1024x768x64,000 – if you want need something different, based on your hardware, Google “vga lilo”, and you will get a lot of hits with tables to figure out what you want. I think this may actually only affect the screen size during boot up – once it got into X, it went to full size even when I had this set to a different value, one that only used up a small part of the screen.
image – had to change this entirely – pointed at vmlinuz, but after a lot of trial and error (I am a hack at this sys admin stuff, I only scrape by), I figured out the linux24 is the boot image that I needed.
append – this is the interesting part – this allows you to pass boot options to the Knoppix boot process. There was originally a vga=791 in here, but I had to take it out because lilo.conf choked all over it. First thing that I had to change was lang – it was set to German, which made things interesting when it booted the first time. Basically I had to boot from the cdrom again to fix that one 😉 There were quite a few hdx=scsi lines, I nuked all of them except for hda, since I am never going to have more than one “hard drive” in the system. I had to add initrd=/boot/minirt24.gz – I think this was what finally got me booting off the hard drive, with the system convinced that it was booting off the cdrom. You can look in the /cdrom/boot directory for the details on the noXXXX options, but I just pretty much turned everything off that I knew I was not going to need. For a future project, I am pretty sure that I am going to need pcmcia since it does not have a USB port, so I will obviously remove the nopcmcia option. The restore option I set to the hard drive – I am making the hard drive mounted read only, so it does not actually successfully back up on shutdown unless you change the mount options after booting – you may need to do this a couple of times until you get everything right. Even though the backup does not work all the time, since the option is there, once the backup is there – it will restore just fine, which is really all you want anyway, because once things are set, they are not going to changing, so you don’t need to back it up evertime that the system shutsdown cleanly. BOOT_IMAGE – yes two of them, and trust me on the order – you can play around later, but this way works.
initrd – not sure why this has to be there twice, but again, change at your own risk from the value that I have here.
root – needs to be set to the root partition – unless you are feel strongly about it, leave it be, and only set yourself up with one partition – it is not like this is a workstation or server, this is a embedded Linux appliance 😉
label – leave it be if you know what is good for you.
read-only – of course – that is the theme of this project!
Getting late, will make more entries later on the Perl script and the Compact Flash details. At this point I am really frustrated with the Compact Flash to IDE adapter details – it came with 44 pins, not 43, but of course the interface in the laptop has one of the pin holes filled in – Grr! Good old metal fatigue, 10 minutes of bending back and forth, and walah, no more pin. But of course it still does not quite line up correctly, a little high and a little left, so I need to go scrounge up a male to female 44 pin 2 inch ribbon from Fry’s tomorrow. I also need to post details on the other changes that I made to make the 7 in 4 USB adapter work.
I ran across a couple of articles about DIY digital picture frames, and decided that I just had to try it myself. With an old laptop, a little elbow grease, and a lot of duct tape, it should be easy enough to do.
Turns out, all the articles detailed the easy part – the hardware. The hardware part has been easy so far, but I have had a time of it with the software. My requirements are:
– Cheap
– Decent Looking
– Easy to use
– Bulletproof
– Quiet
So of course I am going with Linux, since there is no way that I am going to pay for a Windows license for this thing. That would immediately nuke cheap and bulletproof.
I initially figured that I would try to go with a non X install, to keep the hard drive space and memory needs low, but the only thing that I could find to display the images was xgv. I guess others have had good results with it, but I have not been able to get it to display images well – they look really bad and blocky. YMMV. After a few evenings mucky around, I finally decided that this was not going to work. The other problem that I was running into was that doing a RedHat install, a “minimal” install was still almost 500 MB, way over the 64MB limit that I was shooting for (more on why later).
After doing some more surfing around, I ran across Damn Small Linux, sometimes known as DSL. It is derived from Knoppix, a Linux install that is meant to be run from a bootable CD. But this guy just could not leave well enough alone, and he wanted to be able to run not off any old CD, but off a business card sized CD, so his target limit was around 50MB. Perfect! And everything is mounted pretty much readonly, except for some parts of the filesystem, which are mounted in memory. Even better (more on why later)!
It took some poking around on his site and on the Knoppix site, to figure out how to get this to work off a hard drive, rather than off the CD. The instructions for running off a hard drive ended up with either an installation that knew that it was on a hard drive, and it acted as such, ie, no read only file systems and such, or ended up taking a lot of space. I finally figured out that once it is booted up, you just need to copy everything from the /cdrom directory to the root of the otherwise empty hard drive. Then you unmount the /boot directory, and remount it onto the hard drive (to make running lilo painless) on the /boot directory. Then copy over the lilo.conf from /etc/lilo.conf to /boot/lilo.conf, and run lilo with the option specify a particular lilo.conf file. I plan to post explicit instructions in a future post, a) to help anyone else, and more importantly b) so that I have a reference when I forget how 😉
I mentioned earlier that I wanted an install of 64MB or less, and that I wanted everything mounted readonly. My hope is that this will lead to a more robust system, since if nothing is ever written to disk, then nothing can be half written if the thing gets unplugged, and so a sudden loss of power should never be a problem. The other reason is that since hard drives (especially in an older laptop) are noisy and hot, I wanted to replace the hard drive with flash memory, using an IDE to Compact Flash adapter. Compact Flash has pretty unlimited reads, but there is a limit on how many times you can write, so I did not want to have any writes going on, or it will just stop working at some point. I got the IDE to CF adapter from ACS, but I have not installed it yet (still tweaking the settings), so I cannot recommend it just yet, but it seems to be well put together so far.
So at this point, I have the laptop apart, the power supply out of the laptop docking station (the external power supply is AWOL), and the OS install is almost ready to go. I am done with the perl script that will be handling the image display duties, and the 7 in 4 flash media to USB adapter is working.
I plan to post explicit instructions on installing to the hard drive, the lilo.conf file that I am using, the perl script, and instructions on getting the flash media adapter working.
Thanks go out to my mother in law, for kindly donating a couple laptops for my project.
Last time I checked, it was the movement of tectonic plates that caused most earthquakes, not the other way around.
There seems to be a huge misconception about what a one time pad really is and how/why it works. Bruce Schneier wrote a very easy to understand article on the subject, for those that would like to know.
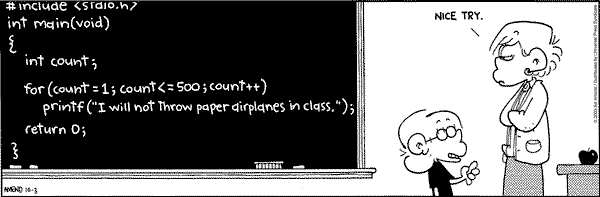
Who can spot the bug? (I did not see it myself until it was pointed out to me by a more observant reader)
To make tabbing work better in Emacs when other editors are being used as well, i.e. display 4 spaces for a tab character, insert spaces instead of tabs when you hit tab:
;; Turn off tabs
(setq indent-tabs-mode nil)
(setq-default indent-tabs-mode nil)
;; Set the tab width
(setq default-tab-width 4)
(setq tab-width 4)
(setq c-basic-indent 4)
Hit reply-to-all on an email that you have not read.
This email went out to (what I now know is) a large email alias about a migration of information. Apparently there are many people on the alias who do not know what to do about this information or why they are getting the email. So they replied. To everyone. So far over 100 have replied. To all.
And the kicker is, the email clearly says that this migration will happen automatically, and you probably do not need to do anything. If you do need to do anything, an email will be sent to you with details and instructions on exactly what to do.
At this point, the number of people replying to all, pleading with others to stop replying to all is running neck and neck with the number of people replying to all to say that they don’t know why they got this email. if you don’t get the irony, please stop reading my blog – you won’t understand most of what I have to say.
I think that the best reply to all was a random recipe…