The 8:18 Machine

Back in the day, my son had a fascination with the number, or more accurately the time, of 8:18, mostly PM. When we were putting him to bed, he could not go to sleep until it was 8:18 – once it reached 8:18, he could go to sleep. This was a problem if we missed seeing it on the clock, or if we went to bed late, or if we needed to get to bed early, or if we were camping – you get the picture. It was kind of like a bit of a security blanket.

So I took matters into my own hands, and created “The 8:18 Machine”. Now we just had to turn it on, hit the big red button, and, boom, there it was, in blazing red 7 segment glory – 8:18.

Not one to leave it quite so simple, I also decided to make it able to display any number (up to 4 digits), through spinning of the 4 potentiometer knobs. Flipping the switch would put it into “number” mode or “clock” mode. But of course, hit that red button, and there it is again, 8:18.

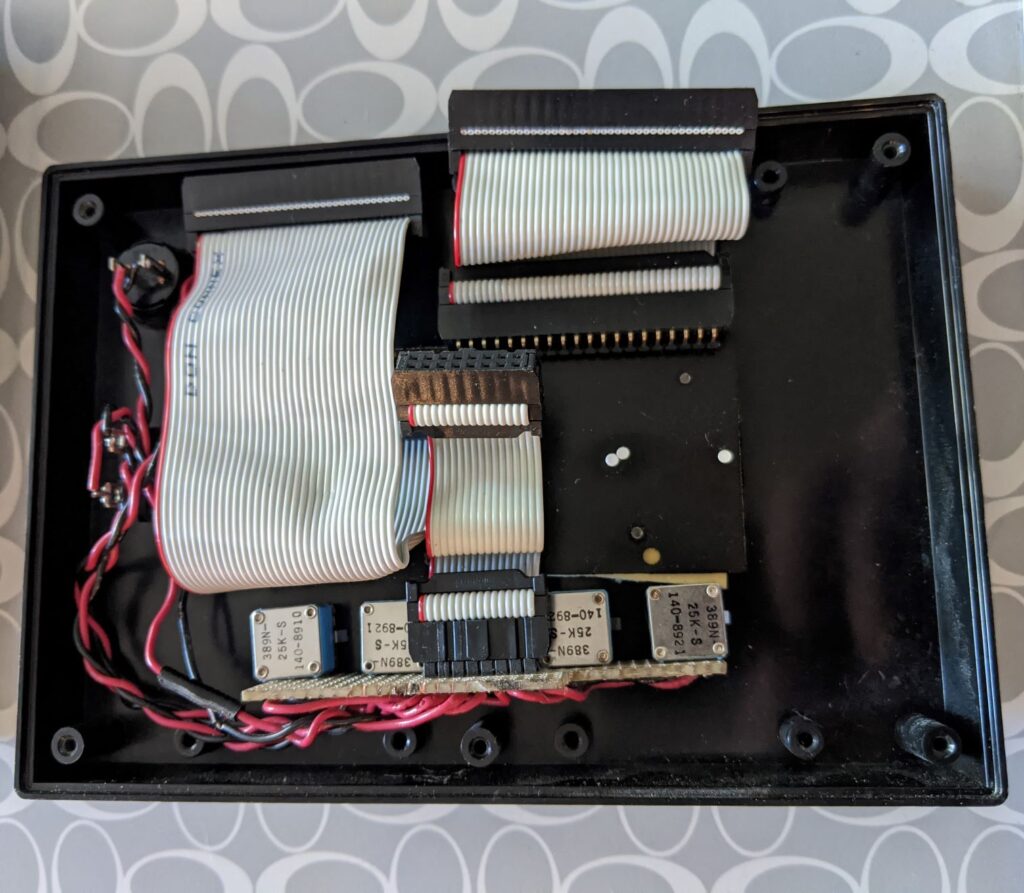
He no longer needs to see when it reaches 8:18 pm, which is now much too early for him to go to sleep :). I was in need of a button for a project, so I went looking for “The 8:18 Machine”, but was surprised at how heavy it is – most of my electronics projects these days are more in the IOT category – small and light. On opening it up, I was reminded, and amazed, and how much effort and circuitry went into this thing. The clock display was dead simple, no i2c here – apply voltage to a segment, it lights up – so one connection for each number, and 4 shift registers, and pushing data into those shift registers from an Arduino I don’t even remember how.

Without further ado, feast your eyes on this rats nest – all hand designed wired and soldered. I think I would cry if I attempted to do this today!

PXL_20201004_221313726

PXL_20201004_221240043

PXL_20201004_221232481

PXL_20201004_221303054

Forwarding email, it just keeps breaking!

Popsicle sticks and duct tape for the win! Well, IFTTT and Firebase anyway.

I run an SMTP server so that I can get email at foo@hraban.com (well obviously not foo, but you get what I mean), but I don’t want to run a full on web mail reader that is exposed to the internet. So I just forward incoming email to specific addresses (I am not running an open relay here folks!) to an external email address at a popular free email service.

But this keeps breaking, for one reason or another, because my ISP SMTP server keeps rejecting my outgoing email, but not telling me, so we don’t find out until a friend tells us that email they sent us has bounced – less than ideal.

IFTTT and Firebase to the rescue! I setup a cron job to send an email out to IFTTT, where a recipe triggers that updates a Firebase record with the received time. The cron job also fetches the received time and checks to see that it has not been too long – if it has been, then it fires off a request to the IFTTT Maker channel, which sends a notification to my phone when triggered.

Ubuntu 13.10 -> 14.04 Upgrade failed when dual booting using the Windows Boot Manager

I upgraded my Ubuntu box from 12.10 to 13.10, and amazingly it worked flawlessly, but then I got cocky and upgraded to 14.04 to get on a LTS version.

This of course did not work.

I am dual booting, using the Windows Boot Manager, but when I chose the Ubuntu option, I would get a black screen and a fast blinking cursor. And nothing…

I had to re-do the creating to the boot bits needed for this configuration, which I did by booting to a liveDVD, and doing the following:

dd if=/dev/sdX of=/mnt/ubuntu/System/ubuntu.bin bs=512 count=1

Where sdX is the boot partition, and my Windows partition was mounted at /mnt/ubuntu/System, and I had previously configured (using bcdedit) the Windows Boot Manager to boot from the ubuntu.bin file.

Partial import from SVN to GIT with history and multiple branches

GIT comes with some nice built in functionality for importing into GIT from SVN, but when you break outside the expected, things get a little weird, a little fast.

I have been doing some migrations of some of a code base from SVN to GIT, but in keeping with the GIT best practices, each artifact gets its own repo, unlike SVN, where everything typically lives in one monolithic hierarchy.

This does not work out of the box, using the basic options. You will want to follow the bit about creating a users.txt file, and the parts for converting tags and branches to GIT branches, however for the clone itself, I found this to work better for me:

git svn clone https://your-svn-server/path/to/repo/ -T path/to/sub-tree/that/is/being/imported –authors-file=users.txt –no-metadata

Hope that helps someone, and maybe even me when I need to do it again and cannot remember how…

WordPress Thumbnails not getting created

On the latest incarnation of the blog, using WordPress, I use a theme called Portfolio Press, which dynamically generates a page based on the posts which are of the “Image” or “Gallery” post format. Except that it was not working correctly – the sizes of the images were different, causing the grid to have a weird layout (float left css anyone?).

I spent a bit of time trying to get the css to do the right thing, got it figured out so that I could cause the pictures to be truncated, but it still did not seem right – the author of the theme had obviously put too much time into the there to have overlooked this use case, what was I doing wrong?

Turns out it is a WordPress (documentation?) defect – when images are uploaded, it is supposed to be creating thumbnails, which are cropped as required, so that the images are all exactly the same size, and of course then the css float works just great. But this was not happening, and when using the Regenerate Thumbnails plugin, I was getting no errors. But the thumbnails were certainly not getting created.

The root cause is that the php-gd extension was not installed – once I installed that, regenerated the thumbnails, and everything now works great. Would have been nice if generating the thumbnails, either during upload, or during the regeneration, had given an error indicating that something was not working…

Spring Bean Identity Crisis

I recently ran into, again, a problem with Spring Beans not having an id. While using Spring XML configuration files, the id attribute is optional. However, if the Spring configuration file in question is imported from multiple places, the Bean will be created multiple times, once for each import.

For a very contrived example, say you have file A.xml:

<beans>
    <bean class=”com.example.JobScheduler”>
        <property name=”howOften” value=”10″>
    </bean>
</beans>

And file B.xml:

<beans>
    <import resource=”classpath:A.xml” />
</beans>

And file applicationContext.xml:

<beans>
    <import resource=”classpath:A.xml” />
    <import resource=”classpath:B.xml” />
</beans>

You would end up with TWO JobScheduler instances, each one happily kicking off jobs every 10 somethings.

This is of course not a problem for a Bean that does not “do” anything. But for a Bean that creates its own threads, runs in the background, etc, this can be a definite problem.

So, remember, don’t leave your Spring Beans wondering who they are, give them an ID, so they only get created once.

WordPress Simple-LDAP-Login plugin

Trying out WordPress to replace the aging installation of MovableType that this blog is run on, and ran into a few issues with the Simple-LDAP-Login plugin.

In the Advanced section, configure the LDAP Login Attribute – it claims that you only need to set it if it is something other than uid, but in practice it was not sending an attribute if I did not set the value, so the bind dn looked like “=<username>,<base_dn>”.

Unfortunately, turning on the LDAP Exclusive flag seemed to have no impact, so I will just have to create WordPress user password as very obtuse, so the fallback does not fallback to an easily hacked password.